How to……. Upload Contacts to Capsule CRM
 We have been using Capsule CRM as our preferred contact management system for over 5 years and we recommend it to our clients too. There are many reason to love Capsule CRM and why it works for us as we reported in our blog At Least 10 Reasons why Capsule CRM is Good for Business.
We have run training sessions on how to use it and work with clients to set it up specifically for their business. So, we thought we would share a bit of our expertise to help you make the most of it.
This is the first in a series of bite size guides to using Capsule CRM – How to Upload Contacts to Capsule CRM
Free to Use
Capsule CRM is free to use for up to 250 contacts, so you get quite a good opportunity to work out whether it is right for you. Sign up to Capsule.
Once you have signed up you will want to start adding contacts. There are two ways to do this:
- Bulk upload
- Single additions
Bulk Upload to Capsule CRM
Most people will have some contacts in some form of a spreadsheet and you can upload to Capsule from your spreadsheet. Firstly make sure the information in your spreadsheet is in the correct columns – read my blog on how to do this. You then need to save this spreadsheet as a .csv file. (Please note that if your spreadsheet has a number of pages you will need to save each one as a separate .csv file)
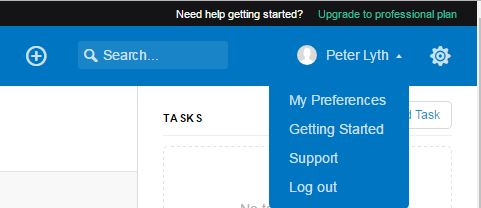
Now go to your Capsule account and look at the right hand side of the toolbar as shown below.
Select the down arrow next to your name and click getting started
This brings up a number of actions you may wish to do to get started, but for this tutorial you are going to select the first one – add contacts and the importing them option.
Now select import from a Outlook or CSV file
Click Choose File and select the spreadsheet you wish to upload.
Now click Upload and Preview
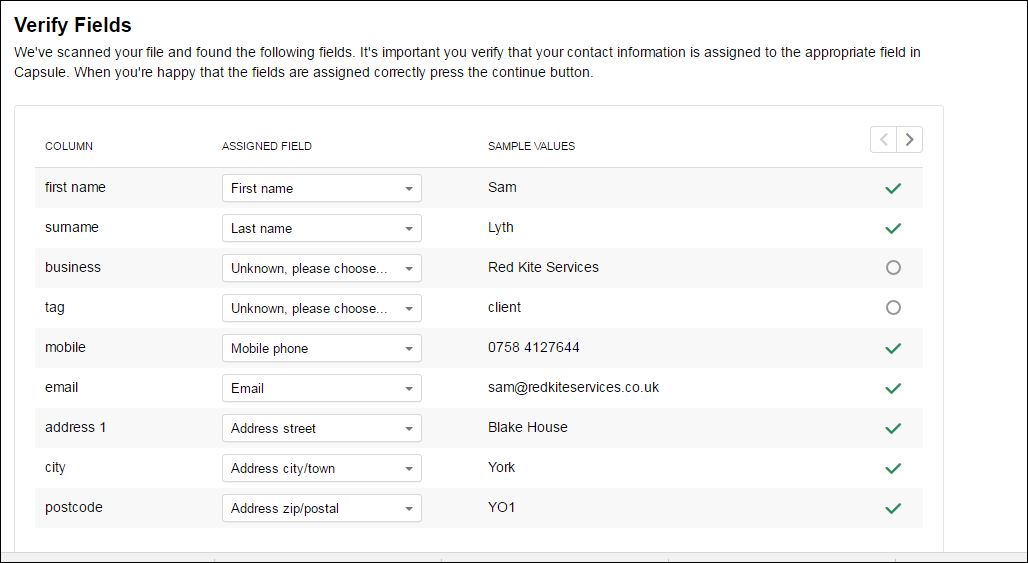
You will now be asked to verify the fields as shown below:
This shows where the system has matched my headings on the spreadsheet with recognised headings in Capsule – as you can see there is a tick next to most of the columns. In this case there are two that are not matched up. You need to click on the arrow where it says please choose. For the business, the matching column is organisation; for tag I have selected apply as tag – this means if you have tagged or categorised contacts in your spreadsheet (eg: client, lead, supplier, associate) these will be transferred onto Capsule CRM.
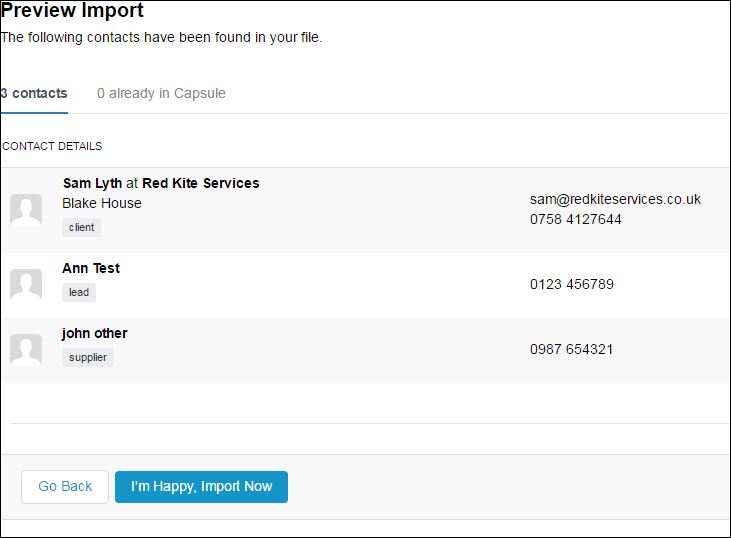
Once everything is ticked you should then click continue. You will then get a preview of the import as shown, you will see that it has kept the tags so that we can sort contacts in the future. It will even tell you if a contact is already in Capsule.
If you are happy with that, click that great big blue button and import. Congratulations, you have uploaded your contacts to Capsule CRM.
Single Uploads
Sometimes you may just want to input details of one person and this is a much simpler process. Look at the right hand top bar again and click on the + sign.
You can then choose to add either a person or organisation (ignore the opportunity or case option for now) and you will get a screen with all the fields you can fill in. One thing I really like is the fact that as you type it brings up possible duplicates, so you are not putting people in more than once.
And that’s it – two ways to upload contacts to Capsule CRM.
If you need any help on any aspects of Capsule CRM, call Red Kite Services on 07584 127 644 and we will be delighted to arrange a training session.


